#
Emulator Selection#
1. NoxPlayer (deprecated)
// The reason is that after setting up the environment, it always prompts you to repair the environment.
2. LDPlayer (current)
// There is one issue with LDPlayer 4.0, which is that it becomes ineffective after enabling WIFI proxy. You need to use ADB to add a proxy or use software like profile for proxy forwarding.
Version Selection#
1. Many apps no longer support systems below 7.0, so it is recommended to install an Android emulator with version 7.0 or higher.
2. Installing XP framework on 7.0 is more complicated. You need to find the corresponding package, so it is recommended to use a one-click installation of XP framework.
Certificate Configuration#
According to the outdated articles online, the common method is to export a Burp/Charles certificate, adb push it to the emulator, and then modify the extension to .crt for direct installation. This method is applicable for Android versions 6 and earlier. Starting from Android 7.0, Android has changed the default behavior of trusting user-installed certificates, and applications only trust system-level CAs. This means that after installing the certificate, if you try to access an HTTPS website through Burp or Charles proxy, the system will prompt "The certificate is not from a trusted authority":
Due to the security mechanism of Android, for systems above 7.0, installing BURP certificate requires adding it to the system trust. Here are some settings that need to be done for BURP certificate as follows:
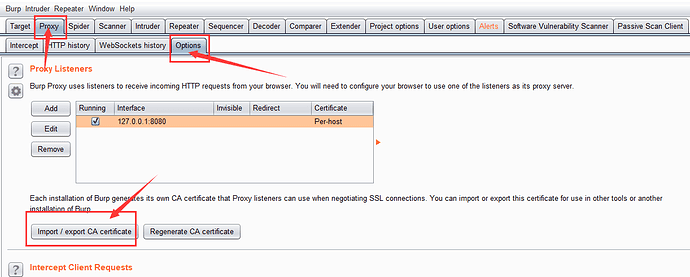
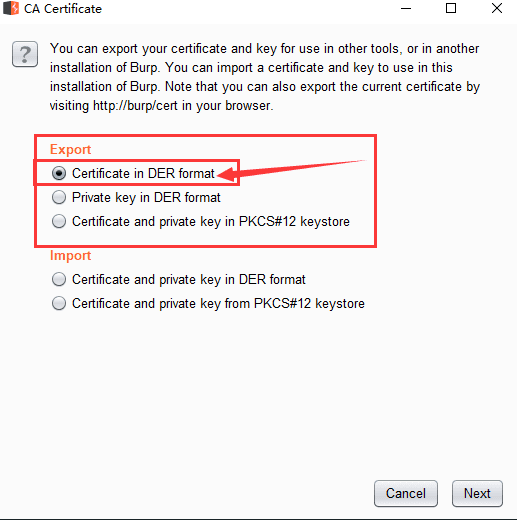
After exporting the Burp certificate, make some modifications using openssl:
openssl x509 -inform DER -in cacert.der -out cacert.pem

View the hash value of the pem certificate and record it, using the following command:
openssl x509 -inform PEM -subject_hash_old -in cacert.pem |head -1

Rename the pem certificate to "hash value.0":
mv cacert.pem 9a5ba575.0
![]()
Then use adb to push the .0 file to the /system/etc/security/ folder of the emulator, and change the permissions to 644:
adb push 9a5ba575.0 /system/etc/security/cacerts
adb shell chmod 644 /system/etc/security/cacerts/9a5ba575.0
If you cannot change the permissions, use adb remount to remove the partition restrictions before importing, as follows:
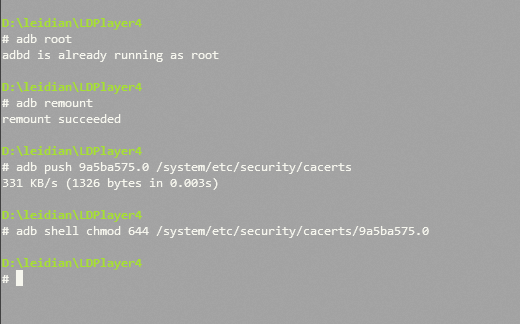
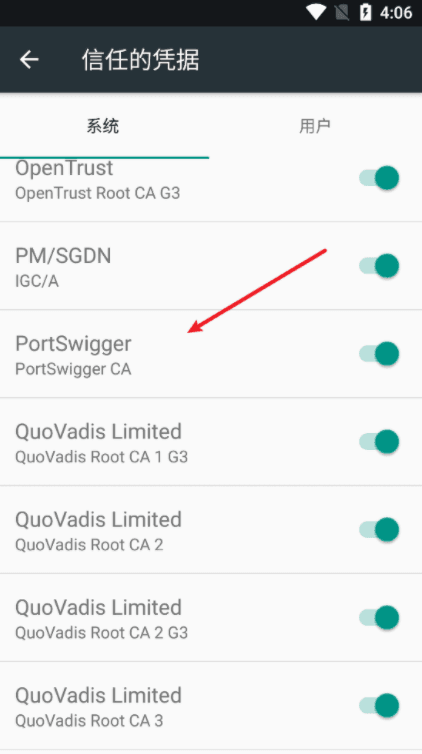
Finally, you should be able to see the trusted certificate in the system.
Installing Xposed Framework#
As mentioned earlier, installation can be problematic, so it is recommended to use a one-click installation based on others' experience.
Xposed_Android_7x64.exe
This file is suitable for 64-bit emulators with Android 7.0. It is not suitable for NoxPlayer, so please do not use it.
Execute the file in the root directory of the emulator and wait for the restart.
Bypassing Two-Way Verification#
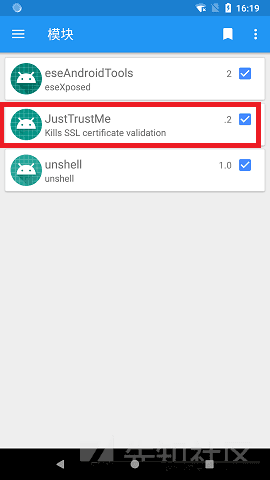
Sometimes, the app will verify the server-side certificate, and in this case, the Burp we installed earlier will not work. The application will reject sending requests when it detects that the certificate is forged. Based on this error message and the inability to capture packets, we can determine that the application has one-way verification, which is SSL pinning. Let's solve the SSL pinning issue first. Use JustTrustMe to bypass client-side certificate verification. Check the JustTrustMe option below and use JustTrustMe under the Xposed framework to bypass SSL pinning.
Adding Proxy to LDPlayer#
As mentioned before, either use proxy forwarding or use ADB. Here, I will provide the ADB configuration.
Add proxy:
adb shell settings put global http_proxy 192.168.2.84:8080
Remove proxy:
adb shell settings delete global http_proxy&adb shell settings delete global global_http_proxy_host&adb shell settings delete global global_http_proxy_port
Or if there is no delete command:
adb shell settings put global http_proxy :0
That's all for now.